通过浏览器和 TCP 调试助手发送脚本
1. 基于 WebSocket 通讯协议
需要有网络的情况下打开此网站
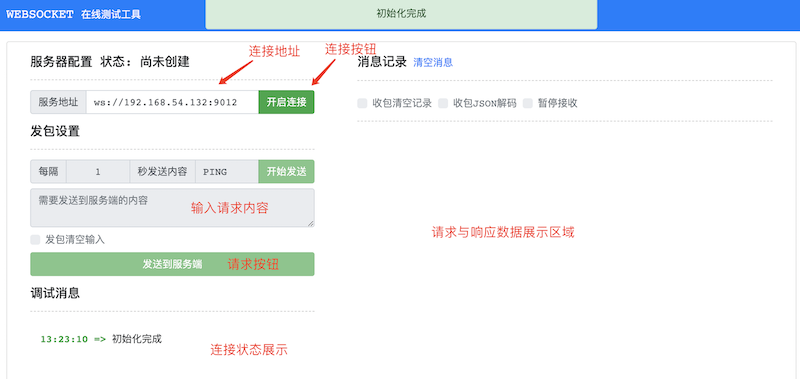
浏览器连接工具说明图
Aubo-control端口对应列表
使用websocket通信协议,必须使用以 ws:// 开始的协议头
- 9012 RPC Websocket通信端口
- 9013 RTDE Websocket通信端口
- 30003 Script Websocket通信端口
操作步骤
1、在服务地址中输入对应的aubo_control地址
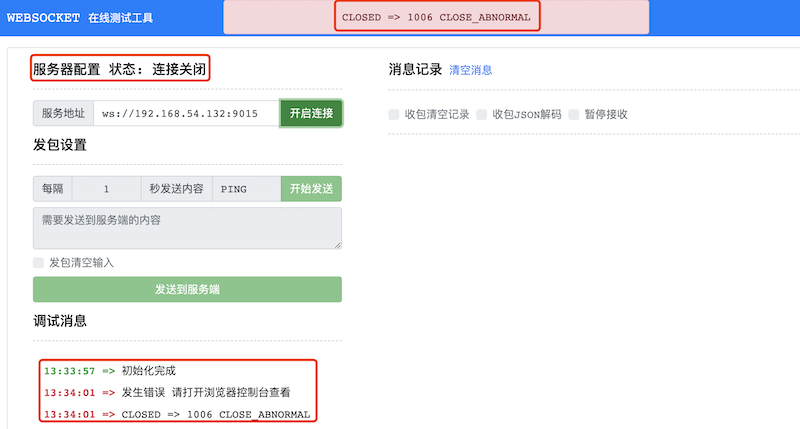
2、点击旁边的【开启连接】按钮,中间会有连接成功的绿色字体状态,【服务器配置 状态: 连接成功】也会显示。 如果连接失败则会显示红色字体状态,【服务器配置 状态: 连接关闭】
连接成功


连接失败
3、发送请求,在【需要发送到服务端的内容】框中输入对应的请求信息即可

4、建议在浏览器开2个页面同时操作 RPC 与 Script 通信操作

机器人基础操作(RPC连接)
此处的localhost为控制器IP地址
连接地址:ws://localhost:9012/
获取机器人名称列表
//请求
{"jsonrpc":"2.0","method":"getRobotNames","params":[],"id":1}

//响应
{"id":1,"jsonrpc":"2.0","result":["rob1"]}
上电
//请求
{"jsonrpc":"2.0","method":"rob1.RobotManage.poweron","params":[],"id":1038}

//响应
{"id":1038,"jsonrpc":"2.0","result":0}
使能(释放刹车)
//请求
{"jsonrpc":"2.0","method":"rob1.RobotManage.startup","params":[],"id":1210}

//响应
{"id":1210,"jsonrpc":"2.0","result":0}
运行状态查看
//请求
{"jsonrpc":"2.0","method":"RuntimeMachine.getStatus","params":[],"id":1211}

//响应
{"id":1211,"jsonrpc":"2.0","result":"Stopped"}
停止运行
//请求
{"jsonrpc":"2.0","method":"RuntimeMachine.abort","params":[],"id":1221}

//响应
{"id":1221,"jsonrpc":"2.0","result":0}
发送脚本
此处的localhost为控制器IP地址
连接地址:ws://localhost:30003/
输入以下脚本程序作为发送请求:
local aubo = require('aubo')
local sched = sched or aubo.sched
local math = aubo.math or math

local sleep = sched.sleep
local thread = sched.thread
local sync = sched.sync
local run = sched.run
local kill = sched.kill
local halt = sched.halt
function p_3()
    _ENV = sched.select_robot(1)
    setCollisionStopType(0)
    setCollisionLevel(6)
    setHomePosition({0,-0.2617993877991494,1.74532925199433,0.4363323129985824,1.570796326794897,0}    )
    modbusDeleteAllSignals()
    setDigitalInputActionDefault()
    setDigitalOutputRunstateDefault()
    setStandardDigitalInputAction(0, StandardInputAction.PowerOn)
    setStandardDigitalInputAction(1, StandardInputAction.PauseProgram)
    setStandardDigitalInputAction(2, StandardInputAction.ResumeProgram)
    modbusAddSignal("192.168.1.1,502", 1, 1, 0, "MODBUS_0", 0)
    modbusAddSignal("192.168.1.1,502", 1, 2, 1, "MODBUS_1", 0)
    setPayload(0, {0,0,0}, {0,0,0}, {0,0,0,0,0,0,0,0,0})
    setTcpOffset({0,0,0,0,0,0})
    setPlanContext(sched.current_thread_id(), 1, "初始变量")
    u57fau5ea7 = {0,0,0,0,0,0}
    u5de5u5177 = {0,0,0,0,0,0}
    Plane_0 = {0.768350098497211,-0.191,0.386240389635923,1.57079632679509,-0.729398907067939,1.37279501958681}
    Waypoint_0_p = {0.4088231104893066,-0.1323967385977438,0.4347702182194097,2.72087314652665,0.4388892171971361,1.558508144688528}
    Waypoint_0_q = {0.0640218,-0.0704569,1.31411,0.242477,1.13968,-0.114125}
    Waypoint_1_p = {0.4153092841363478,-0.1219412898255656,0.2555375392691158,3.052929290665242,0.09279123623776417,1.600158873255395}
    Waypoint_1_q = {0.01351444380551069,-0.2214086568455021,1.654302627486244,0.395411146553418,1.479791428899058,-0.02409079250042809}

    function str_cat(str1, str2)
        return tostring(str1) .. tostring(str2)
    end

    local function calculate_point_to_move_towards(feature, direction, position_distance)
        local posDir={direction[1], direction[2], direction[3]}
        if (math.norm(posDir) < 1e-6) then
            return getTargetTcpPose()
        end
        local direction_vector_normalized=math.normalize(posDir)
        local displacement_pose={direction_vector_normalized[1] * position_distance,direction_vector_normalized[2] * position_distance,direction_vector_normalized[3] * position_distance,0,0,0}

        local wanted_displacement_in_base_frame=poseSub(poseTrans(feature, displacement_pose), feature)
        return poseAdd(getTargetTcpPose(), wanted_displacement_in_base_frame)
    end
    setPlanContext(sched.current_thread_id(), 2, "程序")
    while true do
        setPlanContext(sched.current_thread_id(), 3, "关节运动")
        setPlanContext(sched.current_thread_id(), 4, "Waypoint_0")
        setTcpOffset({0,0,0,0,0,0})
        moveJoint(inverseKinematics(Waypoint_0_q, Waypoint_0_p), 1.39626, 1.0472, 0, 0)

        setPlanContext(sched.current_thread_id(), 5, "Waypoint_1")
        setTcpOffset({0,0,0,0,0,0})
        moveJoint(inverseKinematics(Waypoint_1_q, Waypoint_1_p), 1.39626, 1.0472, 0, 0)
        sched.cancel_point()
    end
end

local app = {
  PRIORITY = 1000, -- set the app priority, which determines app execution order
  VERSION = "0.1",
  VENDOR = "Aubo Robotics",
}

function app:start(api)
  --
  self.api = api
  print("start---")
  p_3()
end

function app:robot_error_handler(name, err)
  --
  print("An error hanppen to robot "..name)
end

-- return our app object
return app
获得的响应:
{"type":"table","name":"Waypoint_0_q","value":[0.0640218,-0.0704569,1.31411,0.242477,1.13968,-0.114125],"event":"updateVariable","robot_index":1}2. 基于 HTTP 通讯协议
curl 命令发送 HTTP 请求方法
curl 是一个命令行工具和库,用于在各种操作系统上进行数据传输。它支持 HTTP 网络协议,通过 curl,使用命令行发送 HTTP 请求并获取服务器的响应。
在使用 curl 命令前,请确保已在操作系统上安装好。可以在终端或命令提示符中运行 curl --version 命令来验证安装是否成功。
通过 curl 来发送 POST 请求的示例如下:
curl --location --request POST 'http://localhost:9012/jsonrpc' \
--data-raw '{"jsonrpc":"2.0","method":"getRobotNames","params":[],"id":1}'--location:这个选项告诉 curl 在遇到服务器返回的重定向响应时自动跟随重定向。当服务器返回一个重定向响应(状态码为 3xx),curl 将自动向新的重定向地址发送请求。--request POST:这个选项指定 curl 发送的请求方法为 POST。在 HTTP 协议中,POST 方法用于向服务器提交数据。通过使用该选项,curl 将以 POST 方法发送请求,使服务器能够接收包含在请求体中的数据。http://localhost:9012/jsonrpc:RPC模块的目标 URL。表示要发送请求的服务器地址和端点。http://localhost:9012指定了服务器所在的位置。localhost是机器人的ip地址,9012是 rpc 端口号。/jsonrpc是具体的端点路径,用于标识服务器上处理 JSON-RPC 请求的资源或服务。--data-raw:用于指定请求体的内容。在这个例子中,请求体的内容是一个 JSON 格式的字符串 ,获取机器人的名称列表。
curl 命令调用 JSON-RPC 接口示例
下面介绍如何使机器人完成上电、关节运动、直线运动等操作,假设机器人的 IP 地址是 192.168.1.36:
获取机器人名称列表 getRobotNames()
JSON-RPC 请求:
shellcurl --location --request POST 'http://192.168.1.36:9012/jsonrpc' \ --data-raw '{"jsonrpc":"2.0","method":"getRobotNames","params":[],"id":1}'JSON-RPC 响应结果:
shell{"id":1,"jsonrpc":"2.0","result":["rob1"]}根据响应结果可知,获取的机器人名称为
rob1。
发起上电请求 poweron()
JSON-RPC 请求:
shellcurl --location --request POST 'http://192.168.1.36:9012/jsonrpc' \ --data-raw '{"jsonrpc":"2.0","method":"rob1.RobotManage.poweron","params":[],"id":2}'JSON-RPC 响应结果:
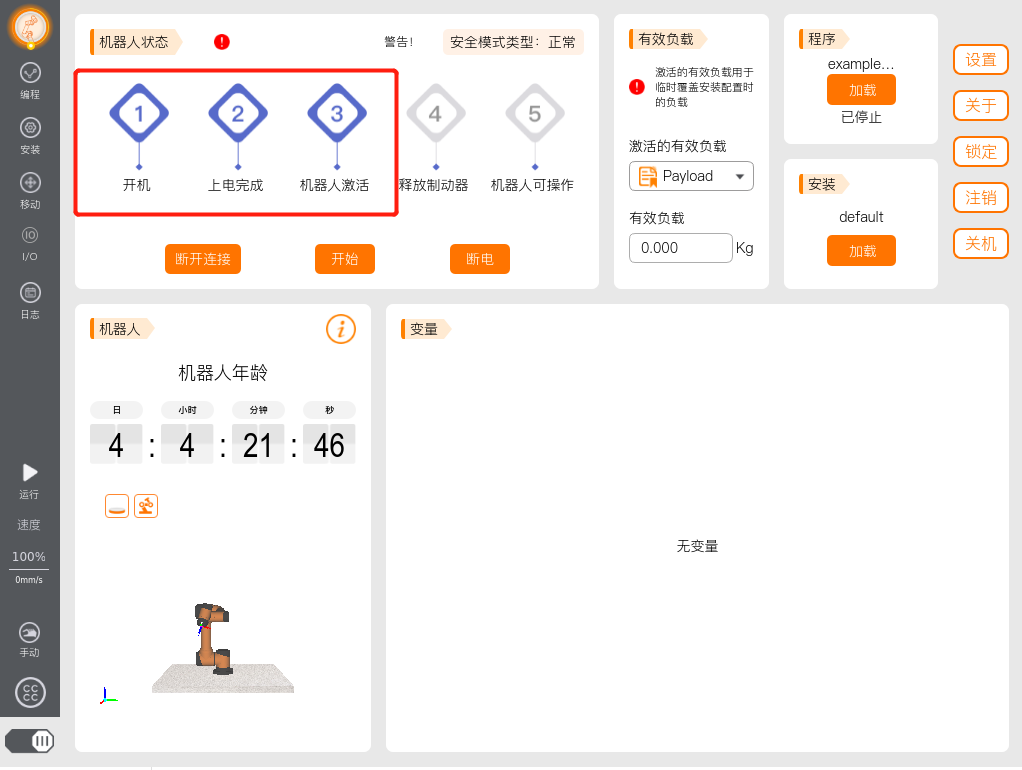
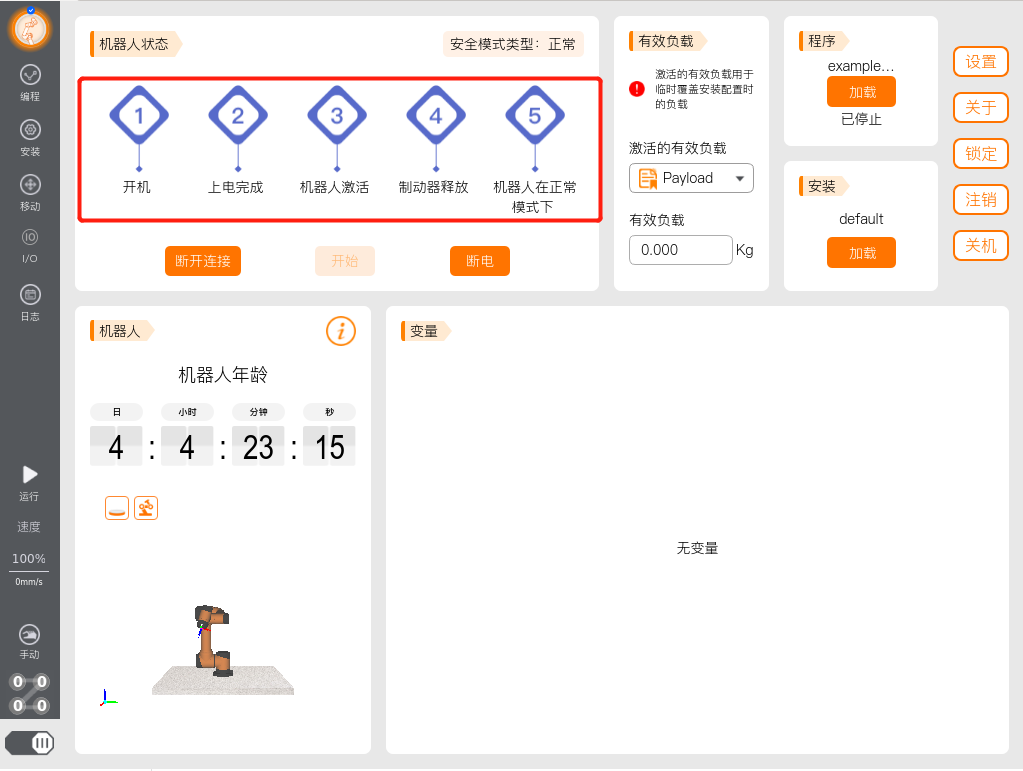
shell{"id":2,"jsonrpc":"2.0","result":0}注:当示教器中三个指示灯全亮时,表明执行完该指令,方可再发送 startup() 指令。
发起启动请求 startup()
JSON-RPC 请求:
shellcurl --location --request POST 'http://192.168.1.36:9012/jsonrpc' \ --data-raw '{"jsonrpc":"2.0","method":"rob1.RobotManage.startup","params":[],"id":3}'JSON-RPC 响应结果:
shell{"id":3,"jsonrpc":"2.0","result":0}当示教器中五个指示灯全亮时,表明执行完该指令。
关节运动 moveJoint()
JSON-RPC 请求:
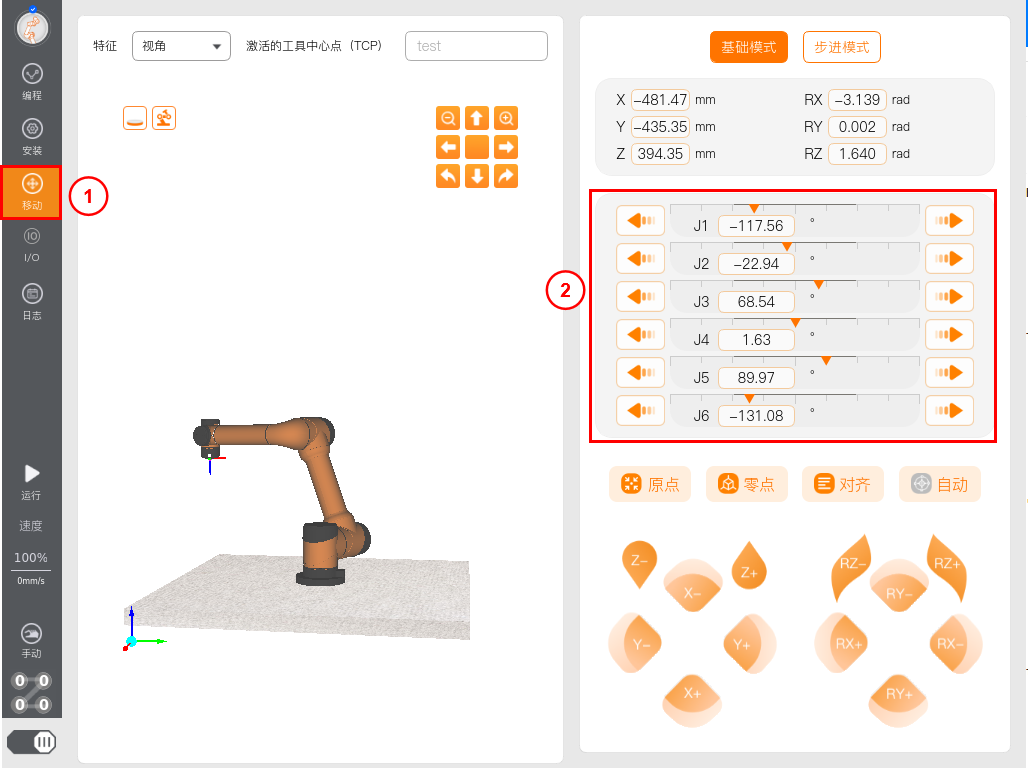
shellcurl --location --request POST 'http://192.168.1.36:9012/jsonrpc' \ --data-raw '{"jsonrpc":"2.0","method":"rob1.MotionControl.moveJoint","params":[[-2.05177, -0.400292, 1.19625,0.0285152, 1.57033, -2.28774],0.3,0.3,0,0],"id":4}'- 第一个参数是6个关节角,单位是弧度(rad)
- 第二个参数是关节的加速度,单位是rad/s^2
- 第三个参数是关节的速度,单位是弧度每秒
- 第四个参数是交融半径,单位是米(m),一般都设置为0
- 第五个参数是运行时间,单位是秒(s),如果对运行时间没有要求,可以设置为0
JSON-RPC 响应结果:
shell{"id":4,"jsonrpc":"2.0","result":0}切换到示教器的 移动 界面中,可观察到当前的六个关节角大小。如下图所示,机器人关节运动到指定的关节角位置。
直线运动 moveLine()
JSON-RPC 请求:
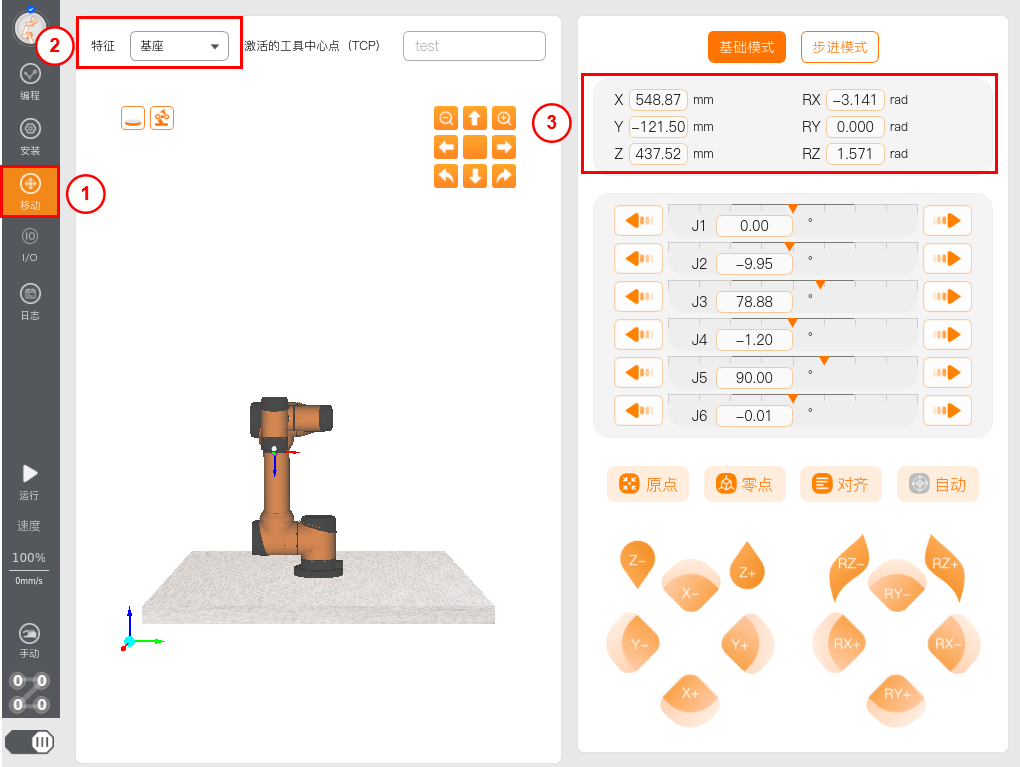
shellcurl --location --request POST 'http://192.168.1.36:9012/jsonrpc' \ --data-raw '{"jsonrpc":"2.0","method":"rob1.MotionControl.moveLine","params":[[0.54887, -0.12150, 0.43752, 3.142, 0.000, 1.571],0.3,0.3,0,0],"id":5}'- 第一个参数是tcp的位置和姿态,[x,y,z,rx,ry,rz],xyz表示位置,单位是米(m),rx、ry、rz表示姿态,单位是弧度(rad)
- 第二个参数是直线运动的加速度,单位是m/s^2
- 第三个参数是直线运动的速度,单位是m/s
- 第四个参数是交融半径,单位是米(m),一般都设置为0
- 第五个参数是运行时间,单位是秒(s),如果对运行时间没有要求,可以设置为0
JSON-RPC 响应结果:
shell{"id":5,"jsonrpc":"2.0","result":0}切换到示教器的 移动 界面中,将 特征 选择 为 基座,即在基坐标系下。可观察到TCP在基坐标系下的当前的位置和姿态。如下图所示,机器人直线运动到指定的位姿。
使用HTTP发送脚本
HTTP测试工具
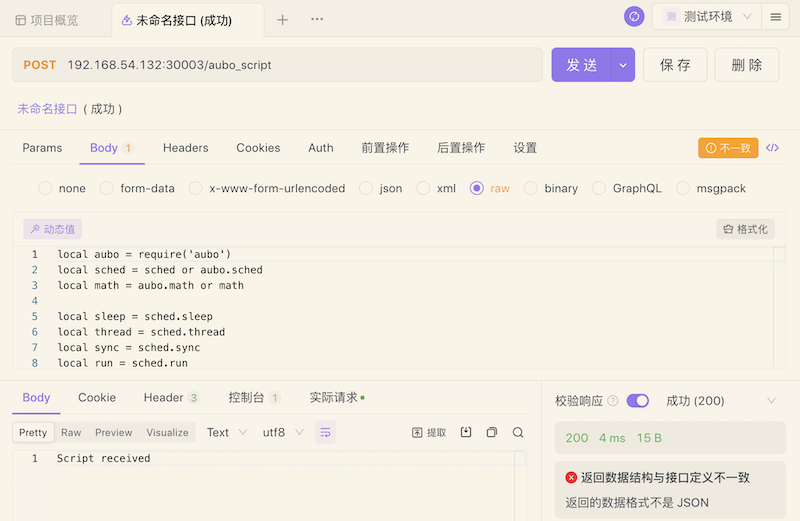
使用POST请求动作,在 请求地址栏 中输入Control IP地址,格式如
{IP}:30003/aubo_script选择下发参数 Body ,参数格式选择 raw
点击发送即可下发HTTP脚本运行请求,响应会返回
Script received则为成功
注意:在发送HTTP运行脚本之前,机器人必须是在上电解除刹车的状态才能运行脚本
Shell请求HTTP
使用curl请求HTTP发送脚本,检查自己的Linux系统是否能使用curl命令
--request POST后面使用Control IP地址,格式如{IP}:30003/aubo_script--data-raw后面是脚本字符串
curl --location --request POST '127.0.0.1:30003/aubo_script' \
--data-raw 'local aubo = require('\''aubo'\'')
local sched = sched or aubo.sched
local math = aubo.math or math

local sleep = sched.sleep
local thread = sched.thread
local sync = sched.sync
local run = sched.run
local kill = sched.kill
local halt = sched.halt
function p_3()
    _ENV = sched.select_robot(1)
    setCollisionStopType(0)
    setCollisionLevel(6)
    setHomePosition({0,-0.2617993877991494,1.74532925199433,0.4363323129985824,1.570796326794897,0}    )
    modbusDeleteAllSignals()
    setDigitalInputActionDefault()
    setDigitalOutputRunstateDefault()
    setStandardDigitalInputAction(0, StandardInputAction.PowerOn)
    setStandardDigitalInputAction(1, StandardInputAction.PauseProgram)
    setStandardDigitalInputAction(2, StandardInputAction.ResumeProgram)
    modbusAddSignal("192.168.1.1,502", 1, 1, 0, "MODBUS_0", 0)
    modbusAddSignal("192.168.1.1,502", 1, 2, 1, "MODBUS_1", 0)
    setPayload(0, {0,0,0}, {0,0,0}, {0,0,0,0,0,0,0,0,0})
    setTcpOffset({0,0,0,0,0,0})
    setPlanContext(sched.current_thread_id(), 1, "初始变量")
    u57fau5ea7 = {0,0,0,0,0,0}
    u5de5u5177 = {0,0,0,0,0,0}
    Plane_0 = {0.768350098497211,-0.191,0.386240389635923,1.57079632679509,-0.729398907067939,1.37279501958681}
    Waypoint_0_p = {0.4088231104893066,-0.1323967385977438,0.4347702182194097,2.72087314652665,0.4388892171971361,1.558508144688528}
    Waypoint_0_q = {0.0640218,-0.0704569,1.31411,0.242477,1.13968,-0.114125}
    Waypoint_1_p = {0.4153092841363478,-0.1219412898255656,0.2555375392691158,3.052929290665242,0.09279123623776417,1.600158873255395}
    Waypoint_1_q = {0.01351444380551069,-0.2214086568455021,1.654302627486244,0.395411146553418,1.479791428899058,-0.02409079250042809}


    function str_cat(str1, str2)
        return tostring(str1) .. tostring(str2)
    end

    local function calculate_point_to_move_towards(feature, direction, position_distance)
        local posDir={direction[1], direction[2], direction[3]}
        if (math.norm(posDir) < 1e-6) then
            return getTargetTcpPose()
        end
        local direction_vector_normalized=math.normalize(posDir)
        local displacement_pose={direction_vector_normalized[1] * position_distance,direction_vector_normalized[2] * position_distance,direction_vector_normalized[3] * position_distance,0,0,0}

        local wanted_displacement_in_base_frame=poseSub(poseTrans(feature, displacement_pose), feature)
        return poseAdd(getTargetTcpPose(), wanted_displacement_in_base_frame)
    end
    setPlanContext(sched.current_thread_id(), 2, "程序")
    while true do
        setPlanContext(sched.current_thread_id(), 3, "关节运动")
        setPlanContext(sched.current_thread_id(), 4, "Waypoint_0")
        setTcpOffset({0,0,0,0,0,0})
        moveJoint(inverseKinematics(Waypoint_0_q, Waypoint_0_p), 1.39626, 1.0472, 0, 0)

        setPlanContext(sched.current_thread_id(), 5, "Waypoint_1")
        setTcpOffset({0,0,0,0,0,0})
        moveJoint(inverseKinematics(Waypoint_1_q, Waypoint_1_p), 1.39626, 1.0472, 0, 0)
        sched.cancel_point()
    end
end

local app = {
  PRIORITY = 1000, -- set the app priority, which determines app execution order
  VERSION = "0.1",
  VENDOR = "Aubo Robotics",
}

function app:start(api)
  --
  self.api = api
  print("start---")
  p_3()
end

function app:robot_error_handler(name, err)
  --
  print("An error hanppen to robot "..name)
end

-- return our app object
return app'
3. 基于 TCP Socket 通讯协议
通过TCP Socket发送脚本字符串或者脚本文件的端口号是30002。
下面介绍如何通过TCP调试助手发送脚本字符串和脚本文件。
示例中发送的脚本字符串如下所示:
--[[
    功能:关节运动
    描述:以关节运动的方式依次经过3个路点
]]
return function(api)
    local _ENV = require('aubo').sched.select_robot(1)
    local sched = require('aubo').sched
    sched.sleep(0)

    pi = 3.14159265358979323846

    -- 路点,用关节角表示,单位:弧度
    waypoint0_q = {0.0/180*pi, -15/180*pi, 100/180*pi, 25/180*pi, 90.0/180*pi, 0.0/180*pi}
    waypoint1_q = {35.92/180*pi, -11.28/180*pi, 59.96/180*pi, -18.76/180*pi, 90.0/180*pi, 35.92/180*pi}
    waypoint2_q = {41.04/180*pi, -7.65/180*pi, 98.80/180*pi, 16.44/180*pi, 90.0/180*pi, 11.64/180*pi}

    -- 设置机械臂的速度比率
    setSpeedFraction(0.75)

    -- 关节运动
    moveJoint(waypoint0_q, 80/180*pi, 60/180*pi, 0, 0)

    moveJoint(waypoint1_q, 80/180*pi, 60/180*pi, 0, 0)

    moveJoint(waypoint2_q, 80/180*pi, 60/180*pi, 0, 0)
end
3.1 通过TCP调试助手发送脚本字符串
下面简要介绍通过TCP调试助手发送脚本字符串的操作步骤:
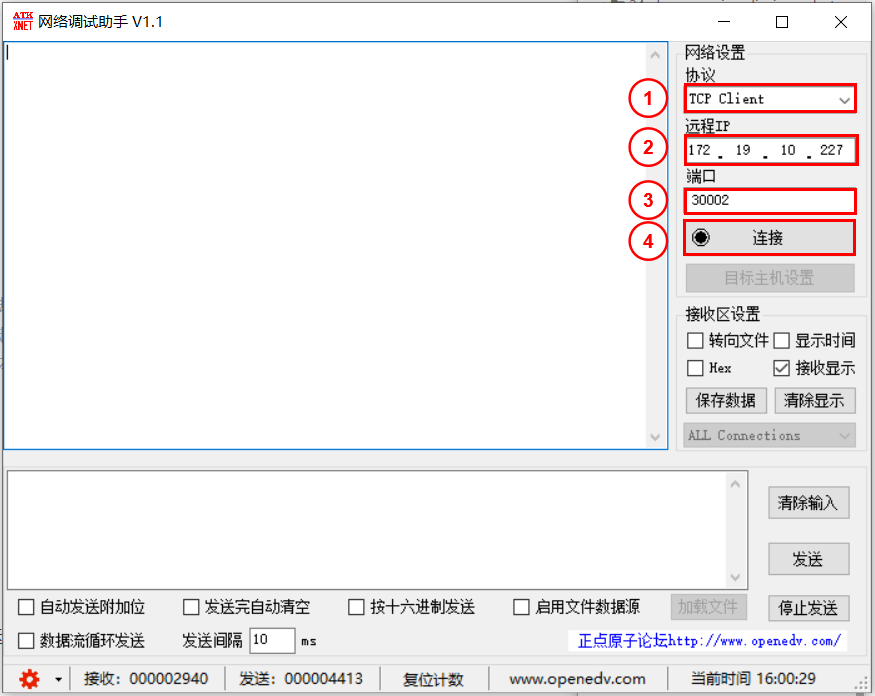
选择 TCP Client,输入机器人的IP地址和端口号30002后,点击 连接。
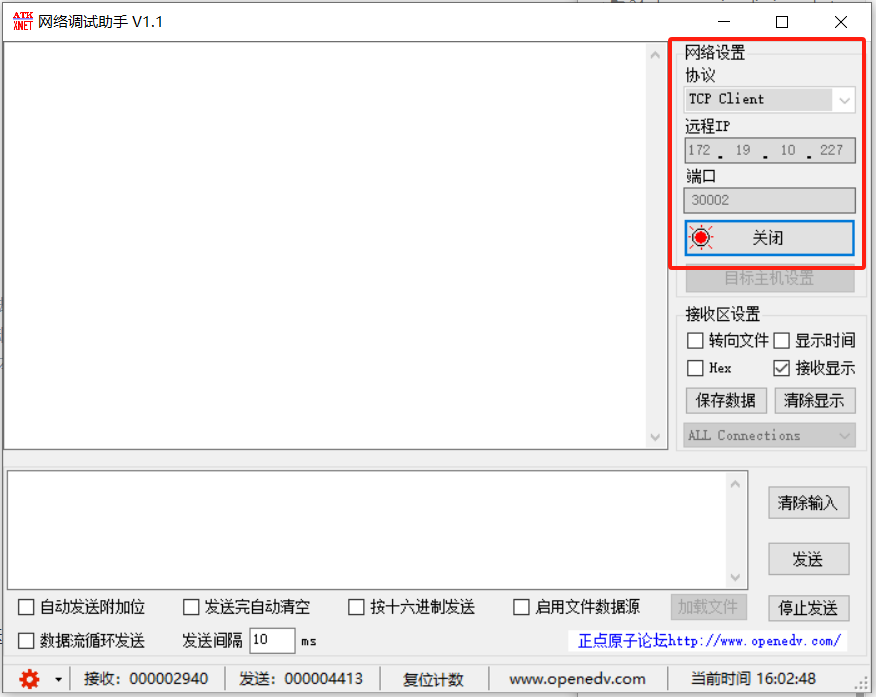
连接成功后,如下图所示。
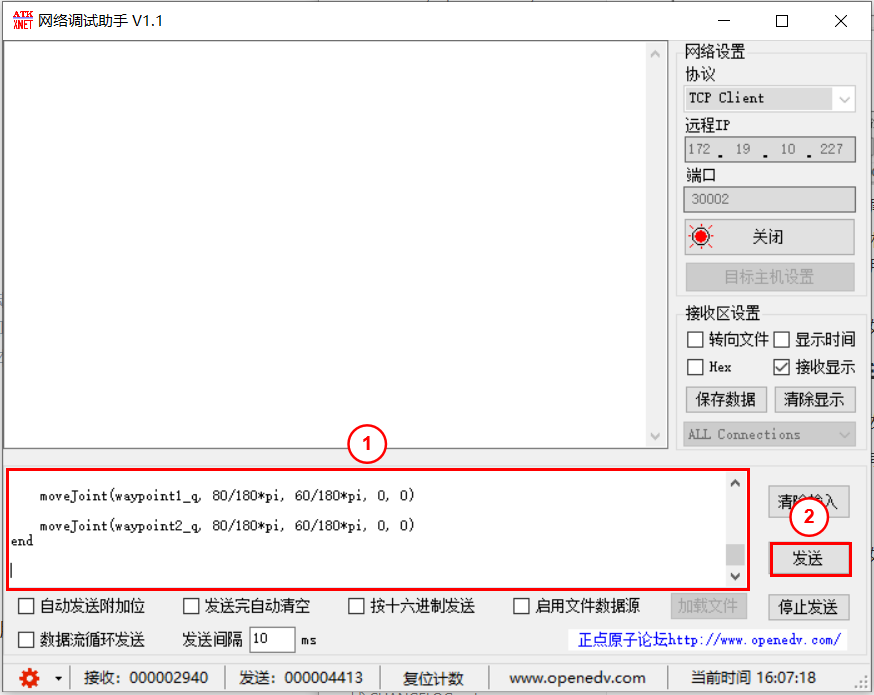
输入脚本字符串,在脚本末尾按下两次回车键,点击 发送。
注:通过TCP Socket协议向机器人控制器发送的脚本字符串,需要以 \r\n\r\n 结尾。 \r\n表示回车换行符。所以,在将脚本粘贴到TCP调试助手中后,还需要在末尾按下至少两次回车键。
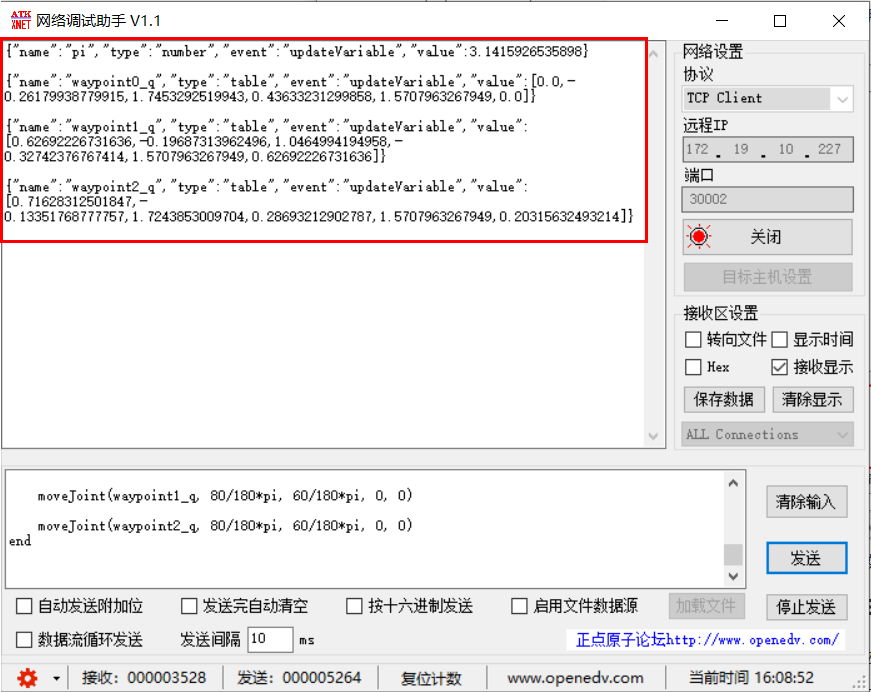
脚本运行成功后,数据接收信息如下。
3.2 通过TCP调试助手发送脚本文件
下面简要介绍通过TCP调试助手发送脚本文件的操作步骤:
选择 TCP Client,输入机器人的IP地址和端口号30002后,点击 连接。

连接成功后,如下图所示。

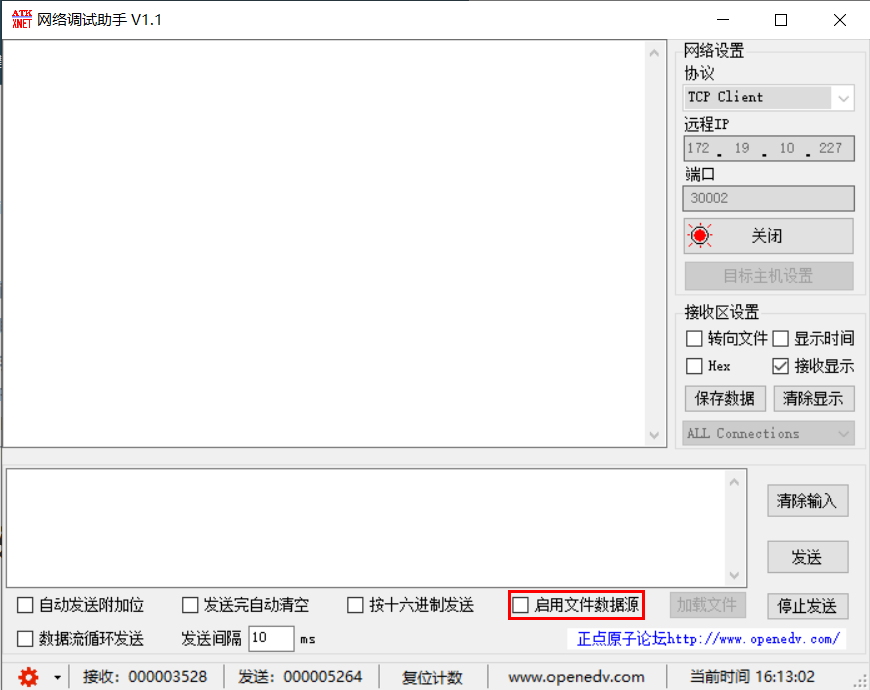
勾选 启动文件数据源。
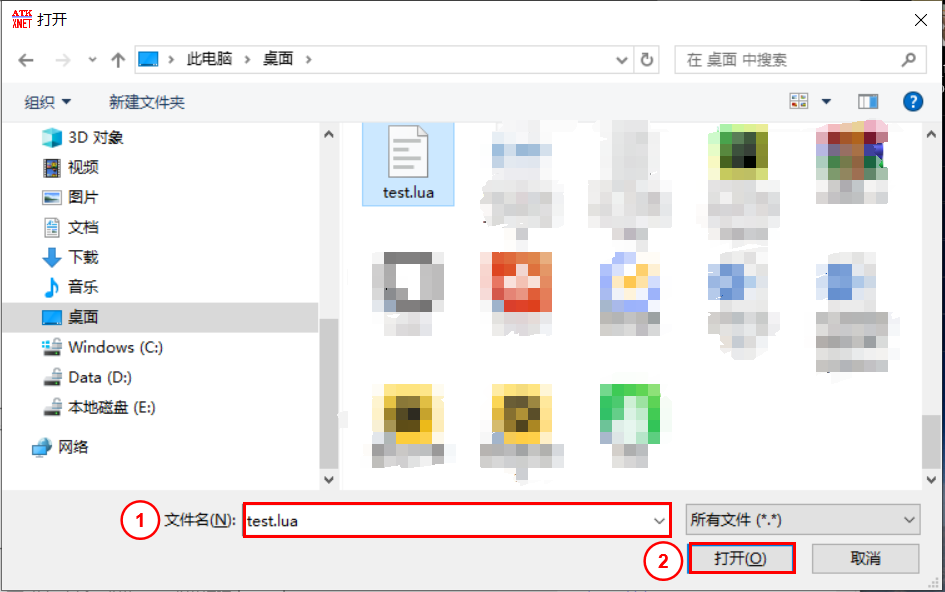
打开脚本文件。
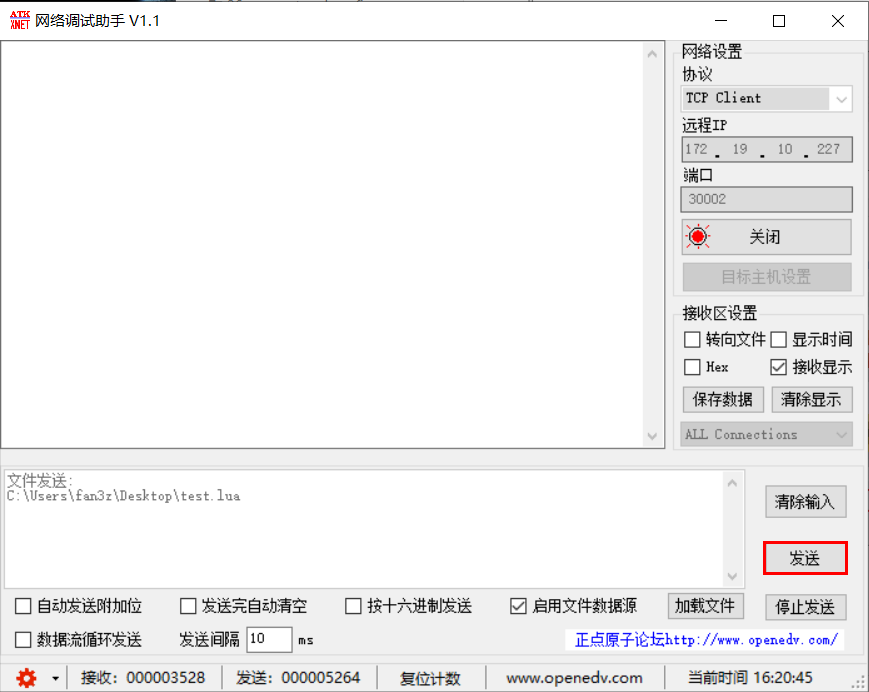
点击 发送。
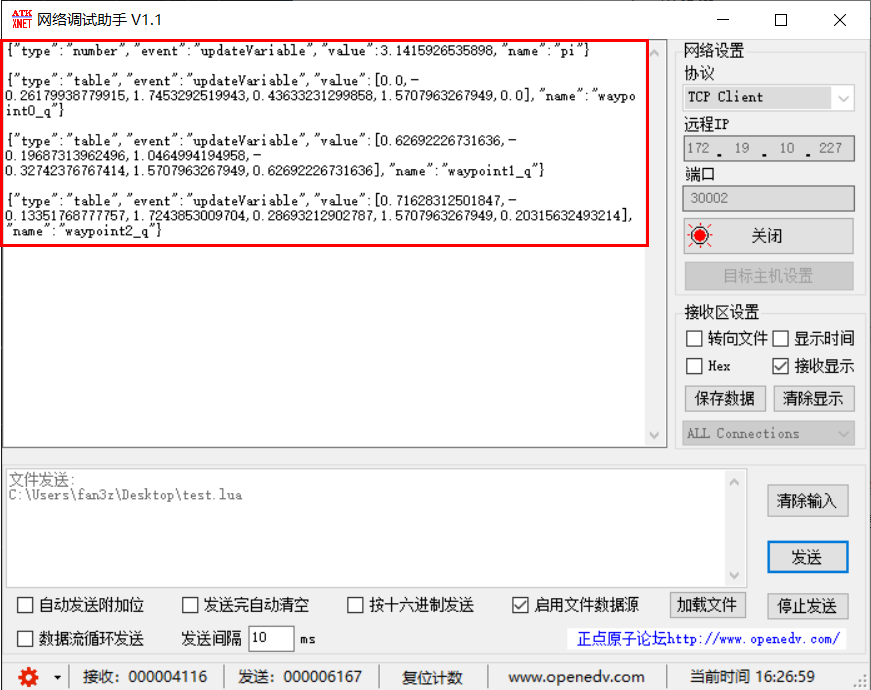
脚本运行成功后,数据接收信息如下。
4. 常见问题
4.1 涉及全角字符乱码
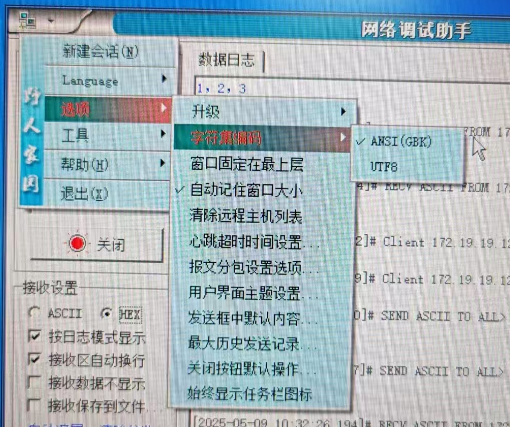
LuaSocket 通讯中,发送或接收全角字符(如中文)时,ARCS 可能出现乱码或无法解析。这是因为 ARCS 软件使用 UTF-8 编码格式
Windows 网络调试工具默认使用 GBK/ANSI 编码,导致字符解析错误。
解决方法:将调试工具的编码方式设置为 UTF-8,确保与 ARCS 通讯编码一致;以 NetAssist.exe 为例,修改方式如下:
